Chocolate graham crackers, because Jackson asked so nicely..

Last night before bed, Jackson affably asked for chocolate crackers and I knew exactly how to oblige. I’ve been sitting on this recipe for a while now and I’ve been making it a point to test new things. My phone has hundreds of pages of recipes saved, not all of which I’ve yet worked through. So we said tomorrow when the sun comes up, we’d make some chocolate crackers.

20140914-223936-81576865.jpg

These days I really like to keep things as simple as possible, so when a recipe can be almost completely prepared in the food processor or mixer, I’m a happy mommy. Simple preparation and simple ingredients are the foundation of my style of cooking and blogging has helped me to realize this.

20140914-223725-81445180.jpg

I’ve never been one to overcomplicate things in the kitchen and when I do, it usually ends up a disaster. I can’t think of an instance offhand when it was rendered completely inedible, but I know it’s happened. So in the compost it goes because my chickens don’t care for table scraps, with their highly refined palates.

20140914-223357-81237180.jpg

But little man loves to be in the kitchen and if you turn your back on him, you might end up with some celery seed in your cake batter. Today I just handed him the phone and let him snap pictures and we were able to avoid any cross-cuisine contamination. I cannot wait for the day when he understands and can be the extra hands in the kitchen. Mommy’s little sous chef.

Chocolate Graham Crackers
These crackers were a bit softer than you may be expecting when baked for 15 minutes. If you like a crisper cracker, increase baking time an extra 2-3 minutes.

1 cup whole wheat flour
1 cup all purpose flour
1/2 cup cocoa powder
1/2 cup dark brown sugar, packed
1/2 teaspoon salt
1/4 teaspoon cinnamon
1 teaspoon baking soda
1/2 cup cold butter, cubed
1/4 cup honey
1/4-1/2 cup water
A little sugar for sprinkling (optional)

Preheat oven to 350 degrees.
Add all dry ingredients to food processor and pulse to combine.
Add cold butter cubes and pulse until it resembles coarse meal.
Add the honey and 1/4 cup water and continue to pulse until it all combines. If dough is still too crumbly, add more water 1 tablespoon at a time and pulse until the dough comes together as one.
Remove and shape the dough into a flat disk and wrap with plastic. Chill 30 minutes to allow to rest and hydrate.
Roll dough out until 1/4 inch thick flouring work surface and top of dough as needed to avoid sticking. Use cookie cutters or a fluted pastry wheel to cut shapes and a fork to poke holes in the crackers.
Place cookies on a parchment lined baking sheet and sprinkle with extra sugar if using, then bake for 15 minutes.
Cool crackers and serve or store.
If you would like to freeze the crackers to be cooked later, after cutting them out and sprinkling them with sugar on a parchment lined baking sheet, place in the freezer for about 20 minutes. Fold them up, parchment and all and transfer to a ziplock bag. Store until ready to use, for up to 4 months. When ready to bake, unroll parchment on a baking sheet and add an additional 1-2 minutes baking time.

Adapted from weelicious

Apple picking and dulce de leche. No skills required.

20140831-234521-85521392.jpg

So we live almost hollering distance from a golf course, which also happens to be the grounds Tucker keeps green, and they’ve got apple trees there that no one touches(!?). The trees line one of the fairways and there are some resident geese and a whole mess of deer that keep the area tidy and free of fallen fruit. The spot is maintained because of it’s location, but the trees are not subject to fertilization or spraying of any kind. Just what the geese leave behind. This is awesome news because they’re #1 on the dirty dozen 2014 and my kids double fist apples.

Continue reading

Even my desserts are growing up…

I’ve been on a super hard nostalgic desserts kick this week. And it’s not just the sweets either. When I start to notice the retraction of daylight, coupled with the “unofficial end of summer” holiday and back-to-school time, I start to feel a little sentimental. Another year past, a few more premature gray hairs that I’ve long since given up trying to cover, packing away the tanks and pulling out the sweaters, loading up a box of the kids’ clothes for consignment. It’s all very bittersweet and I always find my self relishing in it. It makes my otherwise hermitic identity open up a bit and I want I reach out to old friends and reminisce about sneaking out to meet at the park to smoke cloves and share an olde English 40 oz (sorry dad!), listening to Art Laboe’s oldies on B95, break dancing and having a $2 fat slice and soda at fatty Albert’s pizza, Beno’s, slanging ice creams from a truck, the Mexican bakery van, recording videos onto a VHS when MTV really was about music, aqua net hairspray, teased bangs and burgundy lip liner. I’m talking back in the day! Right around 8th grade to be exact.

And now that I think about it, it’s coming up on twenty years since then. Man, the days are long, but the years are short. I quit Facebook 3 years ago, but if I hadn’t, I’d probably hit those girls up right now. Find out when we’re all gonna be in close proximity again and chill. I’m still going to do it, but at a 1995 technologically evolved pace. Like walking home from school and making mixtapes on a cassette. Man I miss those girls. If by some chance you’re reading ladies, hit me up! I’m thinking about you…

20140906-010005-3605226.jpg

So anyways, we’ve been talking about investing in a new DSLR so I can start taking some better pictures. But that’s going to require midnight photo shoots and proper lighting, too. It ain’t easy to stick a cake in front of a couple kids and tell them not to touch while I fiddle and fix. Hence the super close-ups, bad angles and crappy kitchen lighting. Because you can’t see the disaster behind everything when I’m at point blank range. But babe reminds me that it wouldn’t be a ramshackle cookery without it…

All grown up Krispy treats..
(With Special K, peach compound butter and Hawaiian sea salt)

I made this recipe just like I do most other recipes, with what I can find in the pantry. I like to dwindle down the stock once a month to make sure I’m utilizing and rotating everything, so many new creations are born of this habit. Just like building an outfit from a single piece of wear, I build edibles in the same fashion. Started with an almost full bag of marshmallows and went from there. I also had a roll of cinnamon peach compound butter from a bounty a couple weeks ago and an untouched box of Special K. I mean really, it was fate. Tucker assassinated it facially and exclaimed through a mouthful, “is that salt? I could eat this whole slab.” So I saved him the last of it. Don’t mistake my kindness though. I had a pie baking too…

1 10 oz bag of marshmallows
5 tbsp. cinnamon peach compound butter, recipe follows
5 cups Special K (because it’s rice cereal)
Finishing salt

Heat butter over low heat until melted and add marshmallows. Stir frequently until dissolved. Add cereal. Stir until combined.

Now from here, there’s no need to get fancy. Press it into a parchment lined or buttered 8 x 8 pan, or pull it apart in clumps and make balls, then make sure to sprinkle them lightly with some finishing salt. You could also put them on a stick if your averse to tacky fingers, or cut them out with a cookie cutter, I don’t care what you do with them, just make sure the next step is consumption.

Cinnamon peach compound butter

I lo💚e to make compound butters. Fat is flavor and I like to have that present when I eat. You’re probably all worried for me now thinking “but Jes, aren’t you at all concerned with your cholesterol levels?” And while I understand the concern, seeing as every one of my recipes so far has been something fatty and sugary, or even a bucket of sugar itself, I also eat vegetables by the pallet full. I just have yet to get one of those recipes in. But I will, all in good time. It’s easier to hold off on giving the kids sweets than it is dinner while I photograph it.

But this butter is soooo good. Put it on pancakes, put it on waffles, put it on scones, biscuits, toast, even put it on pork chops. Yup! Pork chops. That would be my first choice in fact..

1 stick softened butter
1/4 cup peach purée
2 Tbsp brown sugar
Couple shakes of cinnamon
Pinch of salt (if using unsalted butter)

The easiest way to do this is in a mixer. Add all ingredients and beat well while scraping the bowl with a spatula a few times. Tear off about a foot of plastic wrap and lay flat on the counter. Place the mixed butter in the middle and shape into a log using the long edge of the plastic. Roll up and twist the ends forming it into a log about one and a half inch diameter. Refrigerate or freeze. To use, unwrap and slice desired amount.

This will keep a few weeks in the fridge, or about 2 months in the freezer. Maybe longer. Mine never make it that long.

A pictorial guide to hand pollinating

I’ve been working on this post for almost two weeks now and in my efforts to simplify, I’ve inadvertently found myself making a research paper out of it. Gardening is something I’ve become increasingly passionate about and while I’m totally up for all this input, I’m not sure anyone who reads it will be. But here’s hoping I can reach some gardening nerds, whether this info is new, or way old news.

This year is our third having a garden, and while we have the stalkers (I.e.
Deer, gophers) at a comfortable distance, fertilization is something I’m still working on. While expanding on and diversifying our small crop, I’ve learned quite a bundle about the anatomy and sexual reproduction of plants. It really isn’t just as simple as watering the seeds and pulling the weeds. Certain conditions and creatures must be present for your crop to be successful and with the decline of the bee population in recent years, this is becoming more difficult. Fertilization doesn’t just refer to pollination either. Before any of that, you have to start with good soil, but I’m going to spare soil prep for another time and give you the opportunity to opt out. Poopy dirt may not be something you’re really in to hearing about. My life pretty much consists of hands that are literally wrist deep in it with all the kids in diapers, potty training, and the digging in the garden that I do. But I digress, so back to it.

First, the flower is the sex organ of the plant and to make the whole thing really simple, let’s reduce it to either

perfect,

or

imperfect

flowers. Perfect, or hermaphrodite flowers make up the majority of flowering plants and contain both sex organs. Because of this, these plants are capable of self-pollination. Tomatoes and peppers are examples of plants with perfect flowers. Plants with imperfect flowers fall into two categories. Those that contain both male and female flowers on the same plant are monoecious (think squash, melons). In the other, dioecious, the plants produce only flowers with male or female organs (think kiwis, cannabis).

Because we’re going to see how to assist in open pollination, or fertilizing imperfect flowers, let’s keep those as our focus. Open pollinated plants are those that rely on birds, bees, wind, insects (and gardeners) to pollinate. They develop both male and female flowers and must “mate” in order to fertilize. The window for this process can be very small, as the flowers on some are only open for a short period, so it’s best to get out in the morning when the sun is rising and the flowers blooming and get to work. You can tell with some plants which flowers will open the following morning because they will begin to yellow. If growing different types of the same fruit or veg, there may be some cross pollination that occurs if the bees are working their way around the garden. There are ways to minimize this, but if you’re not saving your seeds you don’t have to worry about it, as it would be next years plants that would be hybridized, with corn being the exception.

It is important to know that pollination is not the only factor in successful fruiting. Many times, even with your hard work, the plants will still abort their fruit. While it can be discouraging, it is almost always something that can be corrected and it’s a great way to get hands on with nature. It will also give you mad respect for the people who grow your food! These variables include but are probably not limited to inconsistent watering, improper nutrition, excessive heat, blossom end rot and excessive nitrogen. Because the sole purpose is to reproduce, if the fruit is not going to produce seeds, the plant will abort it rather than wasting it’s energy growing sterile fruit.

Below is an example of a squash that I hand pollinated that did not take. The blossom end is beginning to yellow and the fruit was shriveling instead of swelling, so I picked and ate it right after this picture was taken.
20140827-112127-40887800.jpg

What happens after pollination is a pretty interesting process as well, and if you’re curious, bobklips is an informative place to find out what this is. Because while Bob’s brain is on botany, mine is mostly on food.

Now there are several different parts to the flower anatomy, but in the spirit of keeping things simple, well just focus on what we need to make ourselves some plant porn. I chose my tromboncino squash as the example as they have large flowers, thus larger anatomy. This is my first year growing them and they are a vigorous and beautiful plant. They are an Italian heirloom that can grow to lengths of over three feet! The fruit can be harvested early and eaten as a summer squash, or you can choose let them mature and they will develop into something similar to a butternut.

This is the actual squash I used in my guide, one week after pollination. It was delicious and this meal took twenty minutes from garden to table!
20140827-110206-39726535.jpg

But you’re here for something else, so here we go!

The male flower of the plant is attached to a long stem.

20140812-232148-84108677.jpg

The female flower will have a fruit or bulge of some kind attached just below the flower.

20140815-104646-38806548.jpg

Inside the male flower you can see the anther, pollen and the ants at work..

20140813-173953-63593735.jpg

Inside the female, you can see the stigma..
20140827-110033-39633210.jpg

Peel away the petals of the male flower to expose the anther, or pollen producing part of the stamen..
20140827-110033-39633473.jpg

Now it’s as easy as “painting” the pollen onto the stigma..

20140812-232733-84453490.jpg

And here you can see the pollen on the stigma. It’s that easy!
20140827-115258-42778303.jpg

Now it’s just a wait and see.. If the fruit begins to swell, not shrivel, over the course of the next day or so, then you have successfully assisted in the sexual reproduction of your soon to be meal! So get up, get out and get hands on with nature, people!

20140827-124133-45693542.jpg

The bee hotel pops built has vacancies!

20140813-114139-42099200.jpg

#plantforpollinators
20140827-112852-41332231.jpg

#seedsaving
20140827-112851-41331971.jpg

<

Mocha kahlua cupcakes

Over the last week or so I’ve been working on a post about hand pollination in the garden and since it has become a investigative study rather than a quick and simple guide, I decided I better drop a small post and recipe for continuity. Not that I even have more than a single consistent reader (thanks dad 💚), but I could use the practice. After all, I haven’t stopped feeding the family and taking crappy pictures of it with my phone…

Tucker texted me last week with a request for a dessert for his boss’s birthday. He knows I’m always looking for a reason to mix pounds of processed sugars and butterfat together in the name of “research,” so I happily obliged. When he first started at the golf course, his boss gave him a bottle of kahlua, for reasons I’m still not clear about, and it has since been sitting in the bottom of the fridge door. I am not a fan. I mean, not even the fact that it is coffee flavored and 40 proof can get me to like this stuff. So I decided I would make something out of that nasty swill and start feeding it back to him, in small amounts if I must, over the course of the life of this bottle of liquor. I wanted it to be easy and fast, as it was a last minute request and I needed to get it there by mid afternoon. I have this one bowl chocolate cake recipe I use in times like these, easy enough, and a pretty simple buttercream I like to use, so I got to it.

Baking is actually my second love in the kitchen, because first I am a cook. I love food, especially vegetables. I would take a bowl of caramelized Brussels sprouts and cauliflower over a fruit salad any day. But I also love to eat Paula Deen amounts of butter and sugar. I am fully aware that baking is a science, but it does not stop me from experimenting. But, while

science

and

experiment

go together well, respectively, in a sentence, it is no indication that it will also do so in a cake. Which is why I think I got chewy cupcakes. The recipe calls for 3/4 cup of coffee, so I substituted 1/4 cup for kahlua because I’m trying to get that stuff out of my house. I’m not sure how alcohol affects the texture of a cake, but they were a little different than I remember. They were not at all bad, except for the aroma of aforementioned liquor, just slightly more springy. It could also have to do with preparation, the temperature of the ingredients, or something else entirely that I’m not aware of, but kahlua was the variable in this experiment, so I’m assuming that’s what it was.

There was a bit of a panic for a moment while making the buttercream, which happens especially with meringue Frostings. When I added the kahlua, the whole thing broke. Alas, having the attitude that this was not an option, as I was getting dangerously close to being out of butter and used two sticks for this frosting, I was able to bring it back with a little extra powdered sugar and cornstarch. The cornstarch I added for stability and because the frosting was sweet enough already. If you’ve ever checked the ingredients in powdered sugar, cornstarch is the other one. It is also used to thicken sauces and gravies and being the rule breaker I am when it comes to baking, I attempted it without research or any knowledge of what the outcome would be. It worked! I put it in the fridge for about 15 minutes, paddled it until it reincorporated, added the extra ingredients and whipped that shit until it it was nice and smooth.

If I’m being honest, I’m really unsure where I found this recipe, but it was adapted and saved from somewhere on the internet. This was before I ever knew I would need a reference, but Martha Stewart is probably the one I need to credit. I know I’ve made hers before and this recipe is almost exactly the same, cut in half.

3/4 cup cocoa powder
1 1/2 cups flour
1 1/2 cups sugar
1 1/2 tsp baking soda
3/4 tsp baking powder
1/4 tsp Cinnamon
3/4 tsp salt
2 eggs
3/4 cup Sour milk (1 tbsp lemon Juice and remainder milk)
1/2 cup cooled coffee
1/4 cup kahlua
3 Tbsp oil
1 tsp vanilla

One bowl chocolate cupcakes

Preheat oven to 350 and prepare cupcake tin with liners. This made about 18.

Add cocoa, flour, sugar, baking soda, baking powder, and salt into the bowl of a mixer. Beat on low speed until just combined.
Raise speed to medium, and add eggs, buttermilk, coffee, kahlua, oil, and vanilla. Beat until smooth, about 3 minutes.

Fill liners 2/3 full and bake until set and a toothpick inserted into the centers comes out clean, about 20-25 minutes. Cool completely before frosting.

Kahlua and coffee buttercream
Be sure to start with room temperature ingredients..
4 cups confectioners’ sugar
2 tsp cornstarch
1 cup butter
2 oz cream cheese
3 Tbsp kahlua
1 Tbsp instant espresso
2 tablespoons whipping cream

Directions
Place instant coffee, cream and kahlua in a small bowl and stir. Set aside to allow espresso to dissolve.
In a standing mixer fitted with the paddle attachment, cream butter on medium speed until fluffy, about three minutes, then add cream cheese and beat until evenly distributed. Scrape down the bowl. Begin adding powdered sugar in 1 cup increments, beating until fully incorporated and scraping down the bowl in between additions.

With the mixer on low speed, slowly stream in cream/espresso/kahlua mixture. Raise speed to medium and continue to beat for 2 minutes more. If necessary, add more cream until desired consistency is reached.

20140822-162155-58915511.jpg

Brown sugar, you’re so easy..

In need of some brown sugar? Do you have white sugar in the pantry and keep molasses around for the occasional cookie or grilling sauce? Then you have brown sugar. It’s just that it’s currently in a deconstructed state. Brown sugar is so simple to make that you’ll never have to buy it again. If it’s something you use regularly, it’s worth getting a jar of molasses to have on hand, because that stuff will last for a long ass time. I needed some tonight for my apple crumble, so I made 2 cups, used what I needed and stuck the rest in a jar with a tight fitting lid. So here ya go.. You’re welcome.

For light brown sugar..

1 tablespoon of molasses to every cup of sugar

For dark brown sugar..

2 tablespoons for every cup of sugar

20140812-214732-78452248.jpg

Put the sugar and molasses in the bowl of your mixer, or a mixing bowl if you’re using a hand mixer. You can also do it by hand, it will just take a little extra time. It’s going to take a few minutes and a couple scrapes of the bowl with a spatula, but you’ll know when it has come together. I used the whip attachment on medium speed and scraped the bowl twice, and it took about five minutes. And that’s it! Use it or store it.
It’s really up to you or your recipe how dark you want to go. I use the different shades interchangeably if it’s what I have. If you stick around you’ll find that’s how so many of my recipes will be. I just adapt to what I’ve got. I moved in with my dad at thirteen, which was a few years after my parents divorced and my brother and sister soon followed. I took over much of the cooking duties for us and haven’t left the kitchen in 20 years…

To dad’s 29th unbirthday..

20140810-134658-49618722.jpg

We’ve never really been a family to celebrate holidays or milestones traditionally, it’s almost always about getting together to mash something into our faces. We still wish each other a happy or merry whatever, but we tend keep the celebrations and decorations to a minimum. Of course when we were children it was different, and now that our parents children have kids of their own, it sort of renews that innocence and fascination. Although we all live within about a 6 mile radius, we keep it homebody status on the regular, so when one of these does come around, we make an attempt to actually leave our houses. Birthdays cause a special disinclination for us grown-ups, because anything that draws attention to a single one of us is just humiliating. I hated speech class for this reason. I would get all sweaty and studdery, saying um every other word through a mouth full of cotton. But if you accidentally forget our birthday, we really won’t mind.

But alas, I may have found a loophole. Having three kids (in four years) has renewed the aforementioned desire to make someone feel special on their annual day of birth, or the day immediate preceding or following that day. Hence today’s unbirthday, birthday celebration. And because my father wishes to remain youthfully suspended in the last year of his twenties (which would now make me four years older than him), then the title of today’s celebration is almost as long as the title of the cake he requested to celebrate this unbirthday. So dad, happy twenty ninth anniversary of your twenty ninth birthday!

Now that I have thoroughly and properly confused you, a cake recipe..

I adapted this recipe from a few different sources and tweaked them for what I had on hand. There is a ton of coconut in this recipe, but it’s not as overpowering as you may be led to believe. The frosting is eggless because I only had 4 eggs and having doubled the recipe, I would be using them all for the cake. The chickens and I take turns not being able to keep up with each other’s production. The caramel can be easily adapted to suit a vegan lifestyle and could not have been easier. The buttercream, despite having an intimidating name, was also a piece of cake. Pun intended.

Coconut Milk Chocolate Cake with Eggless Coconut Pecan Frosting and Coconut Milk Fleur de Sel Caramel Cream Cheese Buttercream
(Or German chocolate cake)

Start by making the caramel

20140810-152112-55272349.jpg

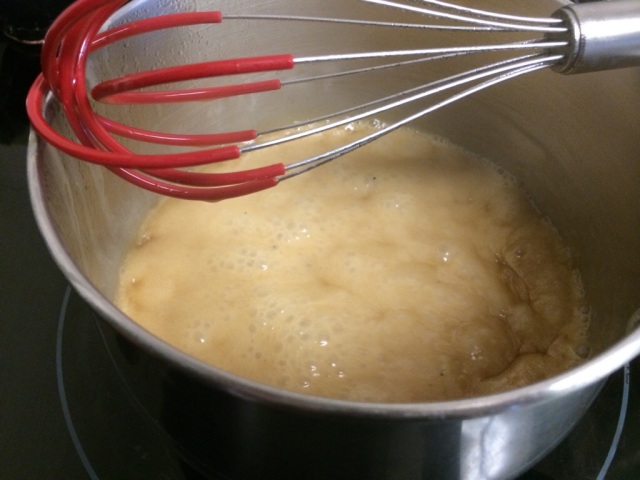
Coconut Milk Fleur de Sel Caramel Sauce
Adapted from
Full measure of happiness

1 can light coconut milk (14 oz)
1 C packed brown sugar
1/2 t fleur de sel (or coarse salt)
1 T butter (optional for vegans)
1 t vanilla extract

This was so simple, combine first three ingredients, bring to a simmer and bubble for about 15 to 20 minutes until thickened. You’ll know when it’s ready because it will change texture and pull away from the pan. Remove from heat and let it rest a couple minutes, otherwise the addition of the last two ingredients will bubble up violently. Once rested, whisk in the rest of the stuff and jar it up. You can keep this in the fridge until you are ready to use, then microwave or bring up slowly in a hot water bath. It made a little less than a pint.

20140810-152344-55424604.jpg

Chocolate and Coconut Milk Cake
Adapted from
In the little red house

2 ounces semisweet chocolate chips
3/4 cup unsweetened cocoa powder
3/4 cup boiling water
6 TBS butter, melted
1 1/2 cups sugar
2 large eggs
1 cup coconut milk
1 1/4 cups all-purpose flour
1 teaspoon baking soda
1/2 teaspoon baking powder
1/2 teaspoon salt

Preheat oven to 350°F.
Butter two 9″ cake rounds and place a parchment round in each. Butter the top of the paper as well.

Place chocolate chips and cocoa in a heatproof bowl and pour over the boiling water. Whisk continually until smooth, it doesn’t take long. Leave on the counter to cool.

In another bowl, combine flour, baking soda, baking powder, and salt. Set aside.

In the bowl of a mixer with the paddle attachment, beat butter and sugar on medium speed until combined. Crack eggs into a separate bowl (in case of shell fragments) and add one at a time, while mixer is running, until pale and thick.

Now whisk together chocolate concoction and coconut milk and stream into the butter and sugar while beating at medium speed.

Lower speed and add dry ingredients in 3 additions until combined.

Pour batter into pan, and bake in middle of oven until a toothpick inserted in center comes out clean, 25-30 minutes.

You should always cool a cake completely before frosting, but this cake is so tender that I would recommend chilling before attempting to frost it. I didn’t need it until the next day, so I wrapped it tightly in plastic wrap after cooling and cleared a spot front and center in the fridge. I even left the parchment on it for the night.

Eggless Coconut Pecan Frosting
Adapted from
Itsy bitsy foodies
**you can omit this step by doubling your caramel recipe and reserving 1&1/2 cups to stir coconut and pecans into. It is a very similar process but was a total afterthought for me that could have saved me the time washing dishes. I am quite lazy.

20140810-155547-57347599.jpg

¾ cup evaporated milk
½ cup brown sugar
½ cup butter, cut into 8 pieces
1⅓ cup shredded coconut
1 cup chopped pecans

Combine the first three ingredients in a pan over medium heat. Bring it to a simmer, stirring it occasionally, for about 10 minutes. Remove from heat and stir in the coconut and pecans.
Let the frosting cool before using, or refrigerate. Make sure to bring up to room temperature before spreading, or you risk tearing your cake.

Coconut Milk Fleur de Sel Caramel Cream Cheese Buttercream
This one was all me

2 sticks of unsalted butter, room temperature
1- 8 oz block of cream cheese, room temperature
1&1/2 – 2 cups powdered sugar
1/2 cup caramel sauce

Cream together butter and cream cheese until fluffy. Add caramel sauce and beat to combine, scraping down sides if the bowl as needed. Add powdered sugar to desired sweetness in increments, stopping to scrape the bowl. Once combined, use or refrigerate. Be sure to bring refrigerated frosting to room temperature and beat again to bring it all back together before use.

Assembly was essentially stack, plop, spread, repeat, using an offset spatula.
Place your first round upside down in the center of your plate. Add the coconut pecan frosting and spread flat. Place second layer right side up and add buttercream. Spread smooth with your spatula, pushing out from the center, but not allowing frosting to hang over the edge. Use your spatula or a bench scraper to straighten up the edges. I left the sides bare to show the multiple layers and Frostings, and used a Wilton 1m tip to pipe swirls. I then added chocolate sprinkles and used a squeeze bottle with a small tip to make the zig zags in the caramel sauce.

20140810-162237-58957585.jpg

20140810-162430-59070990.jpg

Patient little hands 🙂

20140810-170936-61776626.jpg

An open letter to the deer who stalks my garden..

I’ve debated over whether or not to even post this, because I’m sure some people will be offended by my blatant disregard for deer life, but the reality is that this is a work of fiction. A preemptive catharsis. I love animals and my kids find deer fascinating. I also love my vegetable garden, so instead of committing an act of backyard hunting, I’ll reenforce the fences and let the thing live. I’ll probably also plant something along the fence line to keep them away (cactus?), or feed them…

Let me just start by saying that I’ve never much preferred the taste of deer. I think the first and only time I ever tried you was when I was about 10 and was tricked into eating some venison sausage. Because of course I wanted to try some homemade sausage. And not only did I get to taste it once, but I got to try that shit again on the way up. It made me so literally sick to my stomach, the thought of eating poor baby Bambi, that I wretched that sausage right up in a strangers house. And that was that. It wasn’t some life changing, “I’ll never eat meat again” experience, but I realized I preferred it neatly packaged atop a styrofoam tray wrapped in plastic. I was 10 and having grown up in the land of a quarter million cows, it’s what I was used to. There were no deer prancing around the middle of the baron landscape, so when I did see one it was romanticized on TV or something. The first time I saw a “major deer crossing” sign, I thought, this shit must be a joke, right? Someone came out here and put this sign up for my amusement, nice. But I soon realized it was a fair warning to heed. Though being the naturally talented driver I am, I have only thus far clipped a single one of you.

Then there was last year. The year we decided to plant some new roots, literally, by putting in some lovely fruit trees. The apricots and peaches were a gift to me, from my family for Mother’s Day. Ooh was I so happy to see that the peaches had five happy little stone fruits all green and waiting to be nourished to goodness until we could each have one to ourselves. And two for me. Parker wasn’t born yet and even if he had been he would be too young to eat fruit, so I get two. But I digress. As the next few weeks progressed my little green fruits began to turn a peachy color and swell in size, almost ready. Almost. Ready. And then there was you. You who came in my yard, probably with a couple friends, maybe not if you’re anything like me when I’m stalking a snack I want all to myself, and you gobbled that shit up, to death. To death. I’m serious you little fucker you killed my tree. And all that was left was the pit of two of my lovely peaches. Distraught, I buried the pits in the place where they fell and left it alone to become a dried up, dead little stick protruding vertically from a landscaped ring on the ground.

Over the fall and winter we constructed a “proper” gate made of lengths of different sizes and types of fencing, and proceeded to move the garden boxes to the front from the side yard. We gopher proofed the undersides of our boxes, because you weren’t our only problem last year, and talked about even making a spot on the property where we could put food out for you. I was like “fucks that!” But Tucker’s father used to do it, and after a few years, he bagged himself a big ol’ fat deer right in his back yard.

If you recall, I don’t really remember enjoying the flavor of deer. But I’m also no longer 10 years old. In the couple decades plus that have passed since then, I’ve kind of taken a new approach to food. Like I would rather know where it comes from and what it has been eating before I put it in my own body. And you my friend are no factory made, styrofoam packaged piece of beef. I know where you’ve been. I’ve looked you dead in the eye as you walked the tiny ledge behind my sunflowers looking for a good bite at 1 a.m. while I was up with a baby. I’ve nourished the watermelon plants and carefully trellised them up a fence, only to walk out in the morning to a plant destroyed. I watched as my peaches went from almost ready for pickin’, to nothing but a stone pit. I also watched that pit I buried next to that dead stick sprout and become a whole new tree this spring (or as my father pointed out, it may have been a sucker). And the watermelons came back even more prolific than before. But what I’m getting at here is that I know where you’ve been. I know what you’ve been eating. My palette has become more refined with age. I live to eat. And cook. I have a garden full of herbs and aromatics, roots and bulbs to make a variety of pastes, pesto’s, rubs, marinades, sauces and stocks with which to accompany a gamey piece of meat. I no longer eat red meat with the frequency I used to, so you would feed my family well for an extended period of time.

What I’m trying to get at here, deer, is that when I walked out front last morning and saw that you had made yourself a snack out of my beautiful, vigorous tromboncino, I had had it. I text Tucker with a line that went something along the lines of: I’m gonna fucking kill me a deer.. Accompanied by a photograph of said squash. Now I know it may seem a little harsh, the life of a deer for a few squash leaves, but the irony here is, when I eat you, I will be returning all the fruits of my labor back to myself, in the form of deer protein. I planted them, you ate them, I ate you, cycle complete.

So in closing I would just like to once again point out that your meat is not something I desire. Slaughtering, skinning and butchering an animal is not a task I am willing to head on myself any time soon, and having the mobile butcher come out and handle it for me would be pricey. You would most likely be succeeded by one of your overgrown rodent offspring, vindictively stalking the same grounds you preceded him in destroying. So for now, I’ll retreat. You live to see another day. Touché you son of a bitch. Touché.

The case of the faulty temperature regulator..

It’s been a long time now that I’ve been tossing around the idea of documenting my successes and total failures for the world (or no one?) to see. I’ve made many a meal in this crappy little area of my home designated for food production and now when I’ve decided to use it to aid me in producing something more than just the daily bread, the oven decides to crap out on me! It happened a few weeks ago while I was baking a batch of blueberry cream cheese muffins. I flipped on the oven light to give them a peek and the switch popped and threw the breaker.

My first reaction, based on the fear of pizza and cookie-less nights, was that I had completely broken the stove! Leave it to me to jump to the worst case scenario. I’m not always such a pessimist, more of a be prepared kind of gal. But after a text to the better half who was able to calm my nerves, because seriously there’s a lot I can accomplish on the barbecue but pastries are not one of them, I head outside to flip the breaker back on. Oh happy day it worked! Or so I thought. See these muffins only had 5 minutes left, so I never really got a chance to see the underlying problem. Like a real smarty pants though I tried to flip the light back on, forgetting that is what caused the whole debacle in the first place and bam, flipped it again. I decided to let them sit in the oven for a little residual heat blast and when they were done I pulled them out and we enjoyed us some delicious muffins. The entire batch. 16 whole muffins between four of us and my two kids had 2 a piece. I’m no mathematician so I’ll let you work that equation.

Cut to a couple days later and I’m throwing together a batch of apricot pepita granola. As I preheat to 350 I think to myself, boy that oven sure is taking it’s sweet time getting to temperature, but I stick the pan in, blazing red element and all as there’s an infant to be nursed, and set a timer. Not 10 minutes into the 45 minute baking time I smell something burning. So what do I do? I flip the light switch on to see and cue the fireworks. I mean this time it really blew, sparks and all. The switch even melted itself together so when I tried to flip the breaker back on it just kept popping. Revert back into panic mode.

This time even my phone call to the man of the house was fruitless, so I scraped the burned bits off the top of my granola, stuck it on some yogurt and had a pity party on the couch. But, in my oven-loathing moment I remembered that my daddy didn’t raise no fool. I made sure the breaker was off so I didn’t barbecue myself in the process and I took a flathead to that switch and pried that shit right off the stove. I then proceeded to detach the wires, wrap them in some electrical tape and shoved them back inside their hole and taped off the top. Boom. Problem fixed, right? Well the oven can back on this time so I puffed my chest out and thought about what I was going to stick in my facehole next.

The next couple days flew by as I made pancakes, peach BBQ sauce, grilled chicken, pasta, even grilled pizza, thanks to my first encounter with the faulty oven for that lightbulb. See all these things require no oven usage whatsoever so I was still oblivious to the problem. Then came the day of the golf tournament. I’ve been trying to get these people where my husband works to let me cater their tournaments, or at least provide the desserts as a way to get my foot in the door. Today was the day I was gonna pop in with a couple dozen freshly baked muffins for him and the staff to sample as a way to win their hearts through their tummies. These were the same muffins as in which first broke the oven. Blueberry cream cheese with a crumble toppling. We decided that since we murdered them
with our faces the first time that these would be perfect. I got up early, even before the kids and started going to work. As I’m sifting my dry, whisking my wet, combining the two and tumbling in some blueberries and cream cheese pieces I’m not even aware of the disaster that is about to happen. I scoop and plop two dozen of these bitches into their respective wells and stick them in the oven and set a timer. This time I didn’t check or even notice whether the oven had reached temp and the light gone off. I’ve got an infant and two toddlers and honestly, ain’t nobody got time for that! It was plenty of time for it to have reached 375. And reach 375 it had. Then it surpassed and continued climbing until five minutes later I smell burned sugar.

“Oh my stars!” Or some other perhaps more colorful language that I so badly wanted to use, though not in the presence of my precious babies and their innocent ears. I flip the door open and reach for the light, haha, duh, and see a mess of burned topping and raw batter. What the shit!! This is when it all came flooding into a lake of realization. The reason everything was burning was because the oven was taking the liberty of heating itself to kiln temperatures. Okay maybe that’s an over exaggeration. Maybe an electric oven can’t even get that hot. I don’t know, I’m no engineer. But I now know that it wasn’t just my lackadaisical attitude and exhaustion from being up all night with a little babe that had me slacking. It was the damn temperature regulator in my faulty oven. And it only took a huge batch of granola and 2 dozen burned muffins to get me there. But like the clever young lady I am I turned off the oven, let off some of the heat, and continued baking them bitches for my own consumption. They really weren’t bad if you just scooped out the middles.

So, ladies and gents, if your breaker be poppin’, let this be a lesson to you. And don’t get caught scooping out the middles of the muffins and sticking them in your face because you’re cheap. It’s just embarrassing.

Blueberry cream cheese streusel muffins

Ingredients
1 1/2 cups all-purpose flour
1 teaspoon baking powder
1/2 teaspoon baking soda
1/4 teaspoon salt
2 large eggs
1/2 cup buttermilk*
4 tablespoons melted unsalted butter
1/2 cup packed light brown sugar
1/2 cup sugar
1 cup blueberries
4 oz cream cheese, cubed**
Zest of 1 lemon
Streusel Topping:
1/4 cup plus 1 tablespoon packed light brown sugar
1/4 cup all-purpose flour
2 tablespoons unsalted butter, cold, cubed

Directions
Preheat the oven to 375 degrees F. Grease a 12-cup muffin tin and set aside.

Into a large bowl, sift together the flour, baking powder, baking soda and salt. In another bowl, whisk together the eggs, buttermilk, lemon zest and melted butter. Add the sugar and whisk to combine. Add to the dry ingredients and mix until just combined. Fold in the blueberries and cream cheese. Divide the batter among the muffin tin cups, filling each about 2/3 full. (I use a red vollrath #24 disher)

To make the streusel topping, in a small bowl, cut in the cold butter with fork or fingers until incorporated.

Sprinkle about 1 tablespoon of the crumb mixture over the top of each muffin. Bake until a tester inserted into a muffin comes out clean, about 25 minutes. Remove from the oven and let sit in the muffin tin for 10 minutes. Turn out onto a wire rack and let cool slightly before serving.

*in place of buttermilk, use juice of half a lemon and the remainder whole milk. combine and let sit a few minutes to curdle

**place cream cheese in the freezer for half an hour or so to firm up before cubing